
diy cookie kit instructions
DIY cookie kits offer a fun, creative way to bake and decorate cookies at home. Perfect for gifts or activities, they provide pre-measured ingredients and decorating supplies, ensuring convenience and joy for bakers of all ages.
What is a DIY Cookie Kit?
A DIY cookie kit is a convenient and creative bundle containing pre-measured ingredients and tools for baking and decorating cookies at home. These kits typically include dry ingredients like flour, sugar, and baking powder, along with wet ingredients such as butter or eggs. They also often feature decorating supplies, including icing, sprinkles, and cookie cutters. Designed for simplicity, DIY cookie kits allow users to skip measuring and shopping, making the baking process more enjoyable and accessible. They are ideal for gift-giving, family activities, or as a fun project for bakers of all skill levels. Many kits cater to specific themes, like holiday cookies or themed decorating sets, offering a personalized touch. Whether you’re a novice or an experienced baker, a DIY cookie kit provides everything needed to create delicious, custom cookies with ease.
Why Create a DIY Cookie Kit?
Creating a DIY cookie kit is a thoughtful and practical way to share the joy of baking and decorating cookies. These kits are perfect for gifting, allowing recipients to create their own treats with minimal effort. They also serve as a fun activity for family gatherings or parties, fostering creativity and togetherness. DIY cookie kits are cost-effective and customizable, making them ideal for special occasions or everyday baking. By pre-measuring ingredients and organizing supplies, they simplify the baking process, saving time and reducing stress. Additionally, they cater to various skill levels, from novice bakers to experienced decorators, ensuring everyone can enjoy the process. Whether for personal use or as a heartfelt gift, a DIY cookie kit offers convenience, creativity, and delicious results, making it a versatile and rewarding project for anyone.
Benefits of Making Your Own Cookie Kit
Making your own DIY cookie kit offers numerous benefits, including cost-effectiveness, customization, and convenience. By assembling the ingredients yourself, you can control the quality and portion sizes, ensuring freshness and reducing waste. Additionally, DIY kits allow for personalization, enabling you to cater to dietary preferences or allergies by substituting ingredients. This hands-on approach also fosters creativity and fun, making it a great activity for families or friends. Furthermore, homemade kits often cost less than store-bought alternatives, providing long-term savings. They also make thoughtful gifts, offering recipients the joy of baking without the hassle of gathering supplies. Plus, having pre-measured ingredients simplifies the baking process, saving time and effort. Overall, creating your own cookie kit is a practical, enjoyable, and rewarding experience that combines creativity with convenience.
Materials Needed for the DIY Cookie Kit
Dry ingredients like flour, sugar, and baking powder, wet ingredients such as butter and eggs, and decorating supplies like icing and sprinkles are essential for a complete DIY cookie kit.
Dry Ingredients for the Cookie Dough
The dry ingredients for your DIY cookie dough typically include all-purpose flour, granulated sugar, baking powder, and salt. These ingredients form the base of the cookie dough and ensure the right texture and flavor. Measure each ingredient precisely to ensure consistency in the final product. For convenience, pre-measure and package these dry ingredients in airtight containers or ziplock bags. Optional add-ins like chocolate chips, oats, or nuts can also be included for customization. Make sure to label each package with its contents and quantities. Using fresh, high-quality ingredients is crucial for the best results. Store the dry mix in a cool, dry place to maintain freshness until ready to use. This step simplifies the baking process, allowing users to focus on mixing and decorating their cookies effortlessly.
Wet Ingredients for the Cookie Dough
The wet ingredients for a DIY cookie dough typically include unsalted butter, large eggs, vanilla extract, and milk or yogurt. These ingredients add moisture, richness, and flavor to the cookies. For convenience, you can pre-measure these ingredients and store them in airtight containers. Optional additions like honey, maple syrup, or flavored extracts can enhance the taste. Ensure all wet ingredients are fresh and of high quality for the best results. When assembling the kit, clearly label each ingredient with its quantity. This makes it easy for the user to combine the wet and dry ingredients when they’re ready to bake. Properly sealing and storing these ingredients will maintain their freshness until use. This step ensures the cookie dough comes together smoothly and bakes perfectly every time.
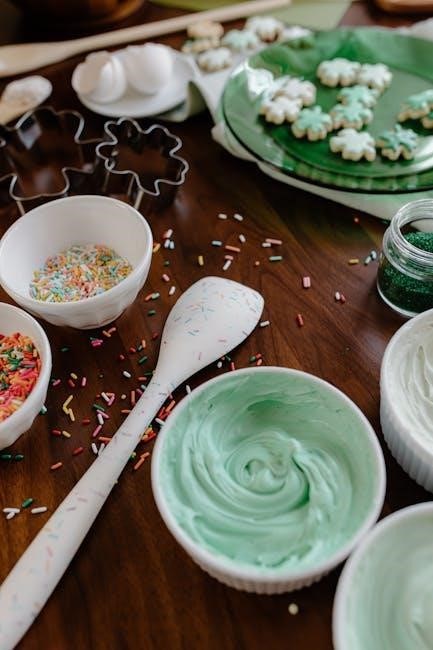
Decorating Supplies for the Cookies
For decorating the cookies, essential supplies include royal icing in various colors, piping bags, and piping tips. You’ll also need cookie cutters to create uniform shapes. Sprinkles, edible glitter, and nonpareils add festive touches. Optional items like stencils or edible markers can provide additional design options. Include a small guide or instructions for techniques like flooding, outlining, and detailing. Ensure all supplies are food-safe and stored properly to maintain freshness; Organizing these items in small, labeled containers will make the decorating process seamless. This collection of supplies allows users to personalize their cookies with creativity and precision, making the DIY kit even more enjoyable and rewarding. These tools help achieve professional-looking results while keeping the process fun and engaging for all skill levels.
Gathering Tools and Equipment
Gather essential tools like mixing bowls, measuring cups, a whisk, rubber spatula, rolling pin, and baking sheets. For decorating, include piping bags, tips, and a turntable for easy access.
Baking Tools Required
To ensure successful baking, gather essential tools like a large mixing bowl, measuring cups, a whisk, and a rubber spatula for mixing dough. A rolling pin is necessary for flattening dough evenly, while baking sheets lined with parchment paper prevent cookies from sticking. An oven thermometer guarantees accurate temperature control, and a timer helps monitor baking time precisely. A cooling rack is indispensable for letting cookies cool completely before decorating; Additionally, a sharp cookie cutter or glass is needed to cut dough into desired shapes. Having all these tools organized streamlines the baking process, making it efficient and enjoyable. Proper tools enhance both the quality of the cookies and the overall baking experience, ensuring consistent results every time.
Decorating Tools Needed
To decorate your cookies effectively, you’ll need a few essential tools. Start with piping bags and piping tips in various sizes and shapes to create different icing designs. A small icing knife or offset spatula is useful for spreading and smoothing royal icing. For intricate details, a toothpick can help create patterns or write messages. Tweezers are handy for placing small decorations like sprinkles or edible glitter. A decorating turntable can make it easier to access all sides of the cookies. Additionally, a clean, damp cloth or paper towels are necessary for wiping tips and cleaning spills. For coloring, use food-grade colored gels or pastes, and a small bowl for mixing colors. These tools will help you achieve professional-looking results and make the decorating process enjoyable and efficient.
Preparing the Dry Ingredient Mix
Combine flour, baking powder, baking soda, and salt in a bowl. Whisk until well-mixed. Sift to ensure even distribution of ingredients for consistent flavor and texture.
Measuring and Mixing the Dry Ingredients
To ensure accuracy, use a digital scale to measure flour, baking powder, baking soda, and salt. Place ingredients in a large, clean bowl. Add optional mix-ins like cocoa powder or spices for unique flavors. Use a whisk or spatula to mix until evenly combined. Sift the mixture through a fine-mesh sieve to remove lumps and aerate the ingredients. This step guarantees a smooth texture and consistent flavor in the finished cookies. Store the mixed dry ingredients in an airtight container to maintain freshness. Proper measuring and mixing are crucial for a successful DIY cookie kit, as they form the foundation of the dough’s quality and bake performance;
Customizing the Dry Mix with Add-ins
Add personality to your DIY cookie kit by incorporating optional mix-ins into the dry ingredients. Common additions include chocolate chips, nuts, dried fruit, or even candy pieces. For a unique twist, try sprinkles, cocoa nibs, or shredded coconut. When adding mix-ins, start with small quantities, such as 1/4 cup per 2 cups of dry mix, and adjust to taste. Fold the add-ins gently into the dry ingredients to ensure even distribution. This step allows for endless creativity, making each cookie kit one-of-a-kind. Experiment with seasonal themes, like red and green sprinkles for holidays or pumpkin spice for fall. Customizing the dry mix enhances the cookie kit’s appeal and provides a fun surprise when baking. Ensure mix-ins are evenly distributed for consistent flavor in every cookie.
Assembling the DIY Cookie Kit
Organize all components, including dry mix, wet ingredients, decorations, and instructions, into a neatly arranged kit. Portion ingredients and label each part clearly for easy use.
Portioning the Ingredients
Begin by dividing the dry ingredient mix into individual portions based on the number of cookies desired. Use airtight containers or zip-top bags to store each portion, ensuring freshness. For wet ingredients, measure out precise amounts, such as eggs, butter, or vanilla extract, and store them separately in small containers. Label each portion clearly with its contents and the quantity to avoid confusion. This step ensures that the cookie kit is user-friendly and promotes consistent results. Proper portioning also helps maintain the quality and shelf life of the ingredients. By pre-measuring everything, the kit becomes a convenient and enjoyable baking experience for anyone who uses it.
Organizing the Kit Components
Arrange all the pre-measured ingredients and supplies neatly in a sturdy container or gift box. Place the dry ingredient mixes, wet ingredients, and decorating supplies in separate compartments or bags to keep them organized. Include a set of instructions or a recipe card outlining the steps for baking and decorating. Add baking tools like a whisk or spatula, and decorating tools like piping bags and tips, in designated sections. Ensure everything is clearly labeled for easy identification. This organized setup makes the DIY cookie kit visually appealing and user-friendly. Consider adding small compartments or dividers to prevent items from shifting during storage or transport. A well-organized kit enhances the overall baking experience and ensures all components are easily accessible when needed.
Baking Instructions
Preheat the oven to 375°F. Combine the dry and wet ingredients, mix until a dough forms. Scoop tablespoon-sized balls onto a parchment-lined baking sheet, leaving 2 inches of space. Bake for 8-12 minutes, until lightly golden. Allow cookies to cool slightly before transferring to a wire rack to cool completely.
Preparing the Cookie Dough
Begin by combining the dry ingredients from the DIY kit with the wet ingredients in a large mixing bowl. Gently fold the mixture until a cohesive dough forms. If the dough feels too sticky, add a small amount of flour. If it’s too dry, incorporate a splash of milk or water. Mix until the dough is smooth and even. For best results, let the dough rest for 10-15 minutes to allow the gluten to relax, making it easier to handle. Once rested, divide the dough into equal portions, depending on the desired cookie size. Roll each portion into a ball and place them on a lightly floured surface. This step ensures uniform cookies and simplifies the baking process.
Baking the Cookies to Perfection
Preheat your oven to 375°F (190°C) and line a baking sheet with parchment paper. Place the cookie dough balls onto the sheet, leaving about 2 inches of space between each to allow for spreading. Bake for 8-12 minutes, or until the edges are lightly golden. Avoid overbaking, as this can make the cookies hard. Once baked, let the cookies cool on the sheet for 5 minutes before transferring them to a wire rack to cool completely. For chewier cookies, bake for 8-10 minutes, and for crisper ones, bake for 12-14 minutes. Ensure the oven is at the correct temperature for even baking. If using add-ins like chocolate chips, they may require an extra minute of baking time. Properly baked cookies will be soft to the touch but firm around the edges.
Decorating Instructions
Start by preparing the royal icing according to the recipe. Use piping bags and tips to create borders, fill large areas, and add details. Let each layer dry before adding more decorations. Experiment with colors and patterns for a personalized touch. Always work on a clean, flat surface and store leftover icing in an airtight container.
Preparing the Royal Icing
Start by sifting 2 cups of powdered sugar into a large bowl to remove lumps. In a separate bowl, whisk together 2 egg whites or 2 tablespoons of meringue powder mixed with 2 tablespoons of water until frothy; Gradually add the powdered sugar to the egg mixture, stirring with an electric mixer until smooth and glossy. Add 1-2 tablespoons of water, a little at a time, until the icing reaches your desired consistency: thin for flooding cookies and thicker for piping details. If desired, add a few drops of food coloring or flavor extract. Transfer the icing to piping bags fitted with small tips for detailed work. Always use clean, dry utensils to prevent the icing from becoming too runny. Store any leftover icing in an airtight container in the fridge for up to 3 days.
Decorating Tips and Techniques
Start by outlining the cookie with a thin border of royal icing to create a frame. Use a piping bag with a small round tip for detailed work. Flood the center with a thinner icing consistency for even coverage. Experiment with color swirling by adding drops of food coloring to the wet icing and dragging a toothpick through it. For intricate designs, pipe lines or patterns and immediately sprinkle with edible glitter or sprinkles. Allow each layer to set before adding more details. Use a damp brush to smooth out icing peaks or correct mistakes. For 3D effects, pipe icing in layers, letting each layer harden slightly before adding more. Practice piping on a spare surface first to achieve steady lines. Let cookies dry completely, preferably overnight, before storing or serving.
Safety Tips and Storage
Handle hot baking sheets with oven mitts, seal dry ingredients in airtight containers, label clearly, and store in a cool, dry place for optimal freshness.
Keep decorations safe from children.
Storing the Cookie Kit
Proper storage ensures the DIY cookie kit remains fresh and ready for use. Store dry ingredients like flour and sugar in airtight containers to maintain their texture and flavor. Wet ingredients, such as butter or eggs, should be kept refrigerated if included. Decorations like sprinkles or icing should be sealed in their original packaging or stored in airtight containers to prevent moisture damage. Label each component clearly and store them in a cool, dry place, such as a pantry or cupboard. Avoid exposing the kit to direct sunlight or humidity, as this can affect ingredient quality. For longer storage, consider using glass or plastic containers with tight-fitting lids. This ensures the cookie kit stays organized and fresh for future baking sessions.
Safety Precautions for Baking and Decorating
Ensure a safe and enjoyable experience when using your DIY cookie kit by following essential safety guidelines. Always use oven mitts or tongs when handling hot baking sheets to avoid burns. Keep children away from sharp objects, hot surfaces, and electrical appliances. Preheat your oven to the correct temperature and never leave baking unattended. When decorating, handle small items like sprinkles or piping tips carefully to avoid choking hazards. Wash hands thoroughly before and after handling food. If using food coloring or dyes, ensure they are food-grade and hypoallergenic. Avoid cross-contamination by using clean utensils and surfaces. For those with allergies, clearly label ingredients and avoid sharing tools. Follow recipe instructions closely to maintain food safety standards. By adhering to these precautions, you can create a fun and risk-free baking experience for everyone involved.
Congratulations! You’ve successfully created your own DIY cookie kit, perfect for baking enthusiasts of all ages. This kit offers a fun and creative way to enjoy homemade cookies while customization options allow for endless possibilities. Whether it’s a gift for loved ones or a family activity, the DIY cookie kit brings joy and nostalgia to the baking experience. By following the instructions, you’ve ensured high-quality ingredients and a well-organized presentation. Baking and decorating cookies fosters creativity and togetherness, making it an ideal activity for special occasions or cozy afternoons. Remember to share your creations and enjoy the satisfaction of homemade treats. Happy baking!